
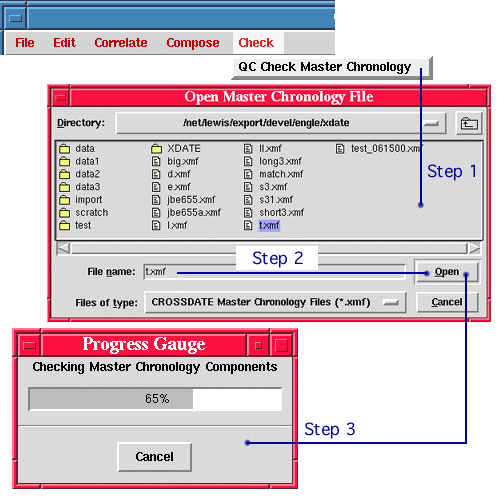
A QC Check for a master chronology file is initiated by selecting Check -> QC Check Master Chronology from the main menu and selecting a master chronology file to check as shown in Fig. 4.1. A Progress Gauge indicates the status of the QC Check. The Master Chronology QC Check Display screen (Fig. 4.2.1) comes up immediately and shows the component check results as each component is processed.
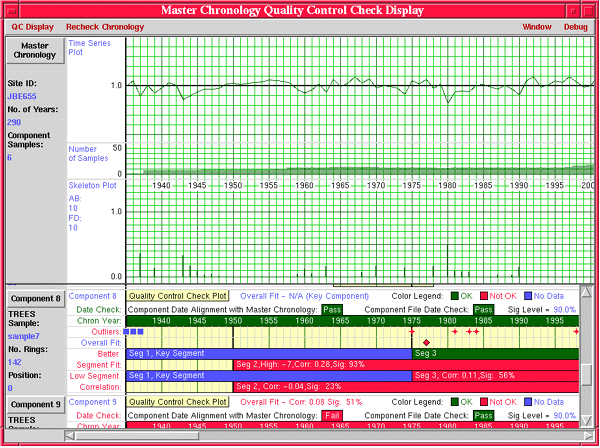
Master Chronology QC Check Display Screen
The master chronology QC check display is very similar to the master chronology component display described in the Compose Tool section. The master chronology is displayed in the upper half of the screen and each of its sample components may be scrolled into view in the lower half of the screen. Menu button controls are provided for the master chronology and each of the sample components as shown in Fig. 4.2.1. After the QC Check, sample components display a QC check plot panel (Fig. 4.2.2) as the default. However, a time series plot, a skeleton plot, or an inverted skeleton plot may also be displayed in the same panel. The main menu command options are significantly different between the two displays.
Color Usage
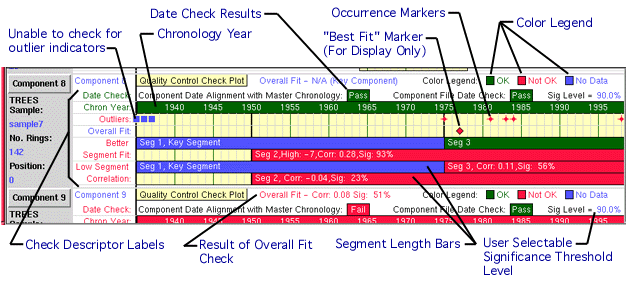
The QC check plot display panel depends significantly on color to convey the results of the check (Fig. 4.2.2).
A pale yellow background with light gray gridlines is used to indicate the time span of the component series. Medium gridlines are used for five-year gridlines, and heavy gridlines are used for twenty-five year gridlines to delineate segment time boundaries.
Descriptor Labels
The QC check plot panel includes a descriptor label and bar plot area for date checks, chronology years, statistical outliers, overall fit, better segment fit, and low segment correlation. To draw the analyst ’s attention to problem areas, the descriptor label for each section is drawn in red, green, or blue as indicated by the result of the check.
Date Check
The background of the date check boxes is changed to indicate the result of the check (e.g., pass,fail). For the date alignment check, the background of the “Chron[ology] Year” bar is changed to match the result of the check. The Date Alignment test checks to see if the dates of the sample component are the same as the corresponding segment of the master chronology. The File Date test checks to see of the sampe component file has been modified since the master chronology was composed.
Statistical Outliers
For each year of the master chronology, sample components with ring widths that are statistical outliers are identified. A statistical outlier is a ring whose index value is greater than 3 standard deviations from the mean index value for the year. There must be at least two sample components in order to calculate the standard deviation.
The index values for each sample component that are statistical outliers are flagged with a red marker (occurrence markers) on the Outlier bar plot. Sample components with index values that cannot be checked are flagged with a blue rectangle.
Overall Fit
Positions where the sample component has a better overall correlation fit with the master chronology are also flagged with a red marker (occurrence marker) in the Overall Fit bar plot area. The Overall Fit information for the sample is indicated on the title line.
If the sample is the only component of the master chronology at any point, then no overall fit check will be performed. The descriptor label will be shown in blue and overall fit info will display N/A.
Segment Fit
Segment boundaries for the sample component are shown in the bar plot areas for Better Segment Fit and Low Segment Correlation. Two horizontally adjacent plot bars are used for these sections to show the segment overlap. The background color of the segment bar is changed to reflect the result of the segment check. If there is a better fit found for the segment, the position of the best fit, its correlation coefficient, and its significance are displayed as text information inside the segment bar. The correlation of the segment with the corresponding segment in the master chronology along with its significance is displayed inside the Low Correlation bar independent of the result of the low correlation check. The significance threshold is used for determining the result of the low correlation check. End segments less than ten years in length are not tested for correlation with the master chronology.
Master Chronology QC Check Menus and Controls
The following menu options are provided for the master chronology QC check display screen:
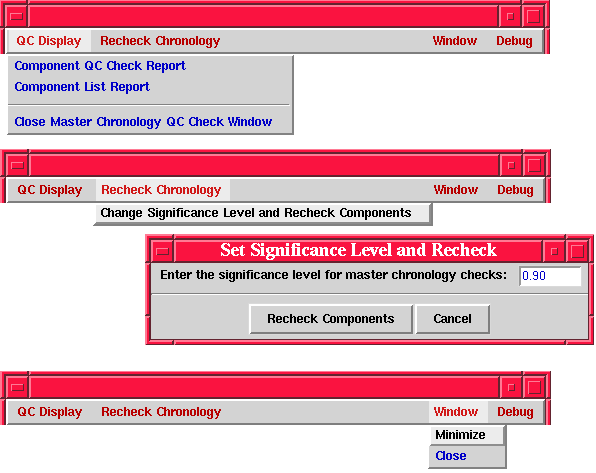
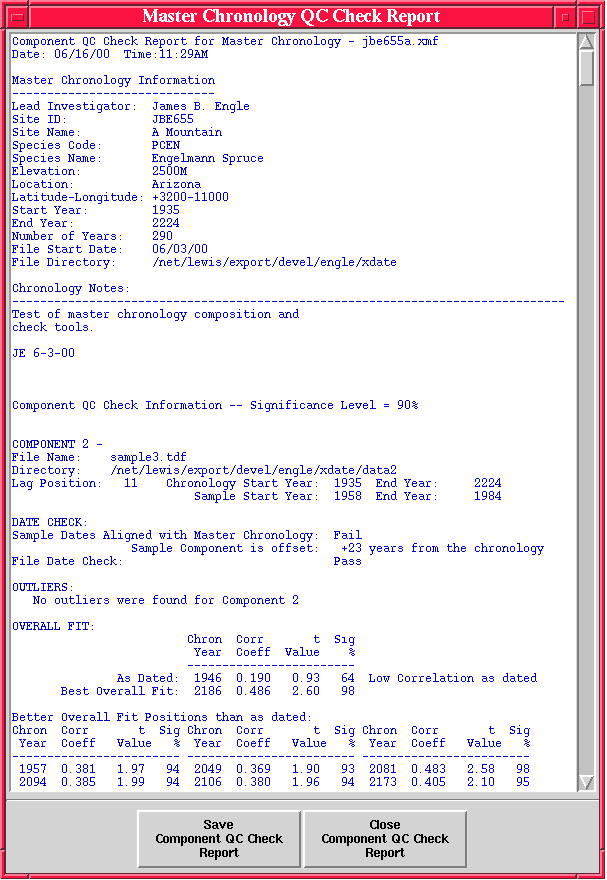
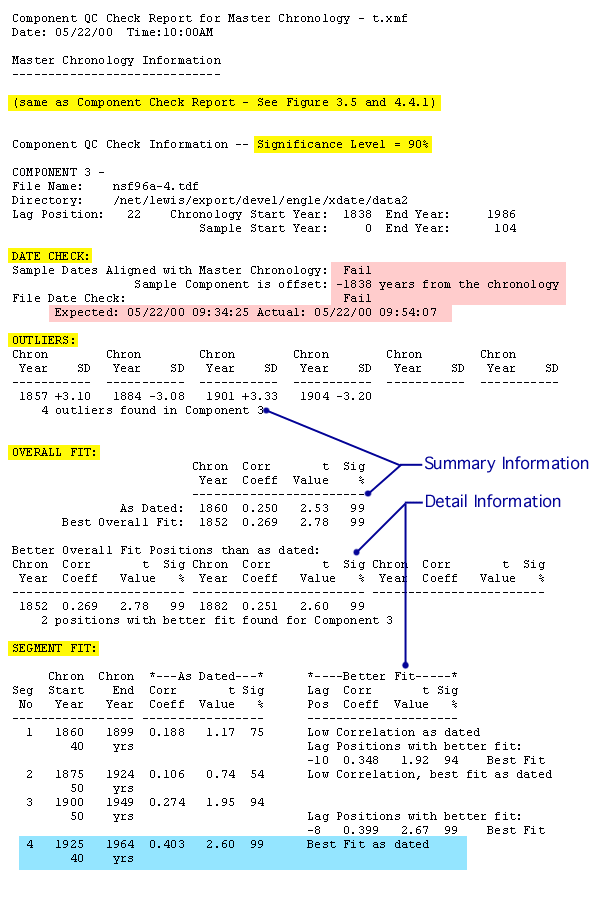
QC Display -> Component QC Check Report - Display a text report listing numeric results for the sample component correlation and statistical checks (Fig. 4.4.1 and Fig. 4.4.2). The Report screen allows the user to save the report to disk.
QC Display -> Component List Report - Display a text report listing all of the components of the master chronology by level with summary attributes (Fig. 3.5). Report screen allows the user to save the report to disk.
QC Display -> Close Window - Closes the master chronology QC check display screen.
Edit -> Change Significance Level and Recheck Components - Allows the user to change the value of the significance test threshold and recheck all components against the new value. The value must be in the non-inclusive range of (0,1).
Window -> Minimize - Iconify the master chronology QC check display window.
Window -> Close - Closes the master chronology QC check display screen.

Master Chronology Component QC Check Report
The Master Chronology Component QC Check Report presents the detailed numeric information resulting from the performing the QC Check on each sample.
 |
![]()
Last Updated: June 2000
University of Arizona
Questions and Comments: trees@ece.arizona.edu
Digital Image Analysis Laboratory and
Laboratory for Tree Ring Research © 2000